|
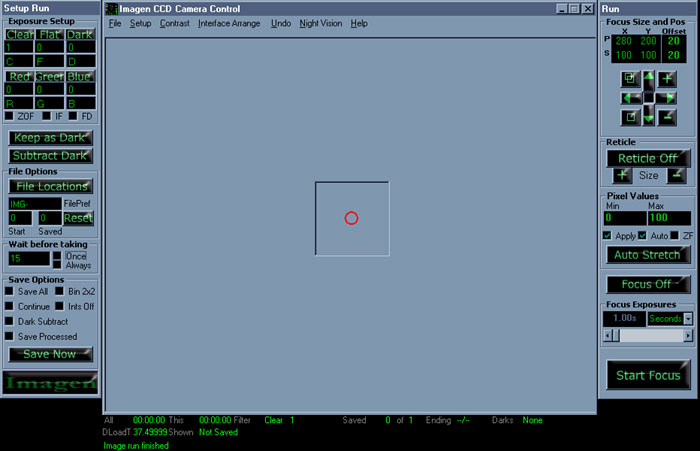
NightVision
A partially implemented Night
Vision mode as shown below running in HX516 2x2 binned mode.
If I ever figure out how to change the colour of option buttons,
scroll-bars, and menu bars, then it will be completely
implemented. I did not want to go the way of changing the entire
windows palette, because I find this approach distasteful.
At present, Night Vision mode is more of a glare reduction
facility than a fully-fledged night mode.
The image itself remains grayscale.
Help
It's a trick really. There is no help, only an About box. Every
user-modifiable parameter on the form has tool-tips though. So for a
one-liner of help on anything you can see on the screen, just point at
it. If nothing happens then the chances are high that you cannot do
anything with it.
|
|
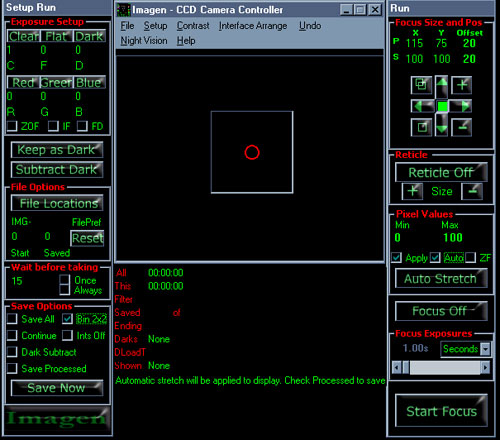
Imagen
Operations
Using
Imagen for the first time
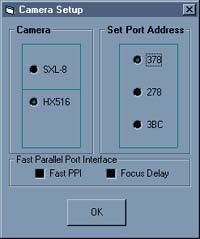
Imagen must be setup the first time it is run. Camera, port and
filter wheel selections should be made before attempting an image
for the first time.
Using Imagen to take images without a filter selector
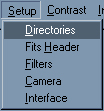
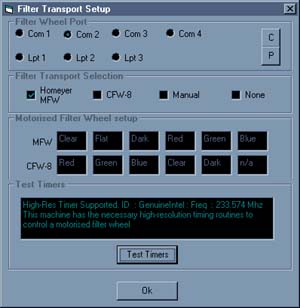
From the Setup menu, select Filter Setup.
Select 'None' in Filter Transport Selection. Filter wheel support
is now disabled.
Click 'Ok'
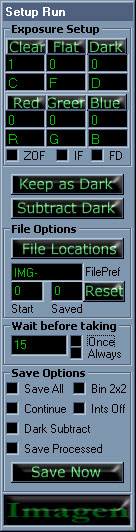
You will notice that the Filters section of the 'Run Setup' panel,
has all of the filter settings grayed out except for the Clear
position. Underneath the Clear button you would enter the number
of integrations to take.
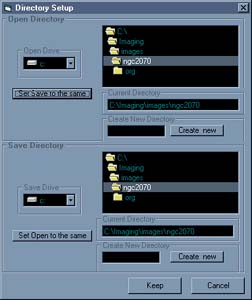
Click the 'Setup Directories' button.
select or create the directory you want your images to be saved into.
In the 'Run setup' panel, enter the filename prefix. All of the
files will be saved with this as the beginning of the filename. It
can be as long as you want but don't go overboard.
In the Integrate panel, Enter the 'Last FIle Num'. This will be
the number before the first number that will be saved. For
instance, if 0, the first file will have 1 added to the filename
prefix. This number increments automatically when saving
images.
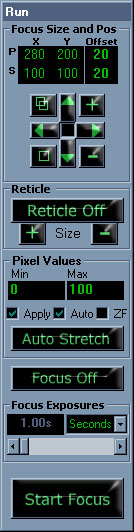
Turn focusmode on or off by clicking the Focus On / Off button.
The button will say 'Focus Off' if it is currently on and vice versa.
Press the Start Focus/Full button
Imagen will show you in the message window which image it is
currently taking and when it is finished.
Using Imagen to take color sets with a filter selector
From the Setup menu, select Filter Setup.
Select the filter transport you have connected in Filter Transport
Selection.
Click 'Ok'
In the 'Setup Run' panel, enter the number of images that you want to take through each
filter into the boc beneath the filter button.
Underneath the filter quantity is the filename suffix. This single
letter will be added to the end of each file taken through that
filter.
If you want to take color images of fast moving objects then
cheking the 'IF' (Interlace Filters) option will ensure that one
image through each filter is taken at a time until all are done.
Normal (non-interlaced) operation will take all of the images
through each filter in turn.
If you want a dark frame taken between each filter change (for
normal operation), or between each cycle (Interlaced on), then
check the 'Framing Darks' option.
If you want a delay to be inserted in the image sequence, set the
delay time in seconds, in the 'Wait before taking' section. The
default is 15 seconds.
If you want a delay before the first image is taken then check the
'Once' option in the 'Wait before taking' section.
If you want a delay before every image taken, then check the
'Always' box.
The rest is as per imaging without a filter wheel. Don't forget to
check the 'Save Images' Box before you start or only 1 image will
be taken and not saved!
Using Imagen to align your telescope pointing system
Many pointing/guiding systems require calibration by aligning the
controller on 1 or more reference stars. Naturally, the better the
alignment, the better pointing and tracking accuracy will be
acheived.
Here is a method I use that gets excellent results. We will assume
the mount is properly aligned before we start.
With the mount properly aligned, select and move the telescope to
your first alignment point.
Ensure that focus mode is on. The focus window will be visible if it is.
Press the 'Start Focus' button. You can use the
default 1 second exposure or set it differently if desired.
If the star is not in the focus window, press 'Stop Focus' (the same
one) button, and take full-frame image by turning Focus mode Off
and pressing 'Start Full' Make sure the 'full-frame' integration time is
not set to 10 hours or something first.
When the image is displayed, check to see if your target star is
there. If not, then there is another alignment issue that needs to
be resolved first.
If the target star is in the full-frame then turn focusmode on again and
click on your target to center the focus frame on it.
Now press 'Start Focus' and Imagen will start focus mode
intgerations of the selected area, and displaying them.
Now move the target star toward the center of the full-frame using
your telescope controls. You may need to adjust the size/position
of the focusframe if you move the image out of it.
Once you get the image near the center, press 'C' on the focusmode
arrowpad to center your focusframe. Then press 'Show Reticle' to
display the reticle in the center of the focusframe.
Center the target star in the reticle. The reticle can be sized to
be from 1 pixel to a full-frame in diameter.
When the star is centered in the reticle, align your controller on
that point.
Now move to the next point and repeat the sequence. I have managed
to get my Sky Sensor 2000 pointing accuracy better than ever
before using this method.
Make sure that the same frame position is used for each alignment
point. The default size/position is useful for this.
Using Imagen to frame objects
Using a C8 at f6.3, a focusframe 100x100 pixels in size, a 1
second exposure and an extreme linear stretch will show details to
Mag 12 in less than 2 seconds.
Take one fullframe exposure of long enough duration to show your
target.
Now show and move the focusframe over to the target as described
earlier and frame it as desired.
If your object is bright enough to see nebulosity in the
focusframe then centering your target should be easy.
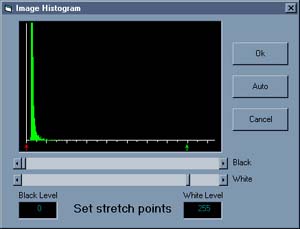
Autostretch may not be the best choice if there is bright stars in
the field. Experiment with manual settings to get the best ones
for seeing nebulosity in a focusframe.
Using Imagen for manual guiding
I have used my camera for training the periodic error correction of
my mount electronics, rather than peering into an eyepiece for ages and
planning physiotherapy.
Find a suitable guide star as mentioned previously and get it into
the fullframe. It doesn't have to be centered.
Once you have the star in focusmode, display the reticle in the
focusframe.
Place the star in the reticle and make the frame and reticle sizes
as small as possible for fastest readout.
With a Pentium 200 and a focusframe of 30x30 pixels, with a linear
stretch applied, I get a little over 2 frames per second
displayed. This is great for tracking. Even my autoguider usually
updates 4 times slower than that at best.
Now train the PEC while keeping the star within the reticle, just
like you would at the eyepiece only without the neck strain. I
cannot convey how much I appreciate this feature.
Using Imagen to take small, fast frames
Note:
Focusframes are only binned 2x2 if the software is running in 2x2 binned mode.
In unbinned mode, they are simply sub-frames read out from a specifically defined area of the CCD chip.
Setup the filter, filename, save directory and wait options in the
'Setup Run' panel as mentioned earlier.
Set the Focusmode times in the 'Run' panel with Focusmode switched on.
If you want a darkframe subtracted, then you need to load one into
the window, from a file or from the camera, and then click the
'Keep as Dark' button the 'Setup Run' panel.
If you want your images saved with the Stretch and Dark Frame
subtracted as they are currently configured, then check the 'Save
Processed' option.
Select the 'Save All' option and press 'Start Focus'
Images will be taken at the current focusframe size and position
and saved using the the filename and filter settings.
Note If the 'Save All' option is not checked then focusmode
will take continuous images through whichever filter is currently
selected until the 'Stop' button is pressed. If 'Save' is
selected, then the filter quantities in the Integrate panel are
used to determine how many images will be taken and through what
filter. This is the case for fullframe images as well.
|